
21 Nov Starting Over (What the Tool Will Do)
Starting Over (What the Tool Will Do)
Quite often it is easy to say “Let’s just start over.” The reality is that, even with the tool, there is a certain amount of work that will be required to make that happen. The QuickBooks® Accounting Software Transaction Copier, developed by Big Red Consulting, was designed to transfer transactional and list information from one QuickBooks file to another. Most posting (i.e. bills, invoices, receive payments, etc) and non-posting (i.e. purchase orders, estimates, etc) can be transferred. The primary exception is anything relating to payroll will not transfer due to the complicated issues related to payroll (and the fact that Intuit has not released their code). Any “links” do not transfer (i.e. an invoice and a receive payment will both import, but will not be linked to each other).
The tool works with Excel 97, 2000, and XP for Windows. It is accessed from within Excel using menus it creates. It does not change Excel in any way, it only adds to the functionality.
Although it has many uses one of the most common is for those users who need to start a new file. It may be because the file has become too large and condensing has not helped. Maybe the file has so many damaged transactions that it is not practical to try to fix them individually. Maybe the client’s copy of the data file is not able to be used and the Accountant’s Review Copy need to be used to create a new working file. Maybe the original set up was incorrect and the only choice is to start over (for example items that have been set up as inventory when non-inventory should be used). Still another example is for a file that only contained part of the information for several years and because of payroll features being used it is impossible to use the “remove ALL transactions” available in the newer versions. These situations as well as countless others (such as Accountants who want to transfer their journal entries to the client in an automated way; remote locations that need to have transactional data transferred into the “main” file; bookkeepers or other employees who handle specific transactional types of entries but do not have access to the file with all the information; etc.) are processed through the tool in the same easy fashion.
One of the major advantages of the tool is that is not version specific (although QuickBooks 99 or higher is recommended). The iif file it creates can be imported into any version. So, if the client has version 99, and the accountant has version 2003, the file can be converted for the accountant to work on it, the entries are used to create an iif file, and the client can import the entries automatically back into the older version.
Another advantage of the tool is that the accountant can use a full back up and still automatically transfer the entries back to the client without the limitations of the Accountant’s Review Copy.
How to use the tool
Be sure that it is necessary to “start over.” For example, problems inherent with inventory or payroll often require a new file to correct the issues effectively, but other Balance Sheet errors can often be fixed within the existing file. If a new file is needed, determine what information will be transferred, what will be re-entered, and what will be ignored.
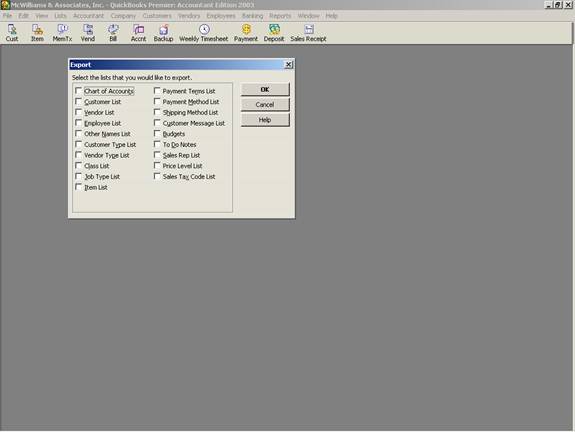
Choose File >Utilities > Export. Place a check mark in the box to the left of the appropriate lists. If you are unsure, check them all. Pay attention to where the file is saved.
Note: All the lists should be in one file to work properly with the tool.

Step 3 – Create a journal report
To create the report, choose Reports > Accountants & Taxes > Journal. This report will be of all the transactions that have been entered into the old file and will be transferred into the new file. The easiest way to do this is to click on Modify Report then the filter tab and choose the appropriate information. Be sure to adjust the transactional date range as appropriate as well. If there are any columns that are not present on the report that should be transferred (such as the item) they can be added on the display tab. It is also possible to filter based on transaction type to eliminate the payroll transactions. Any payroll transactions that are imported are changed into a regular check and will not update the payroll features in the client’s file.
Note: If using the QuickBooks Premier 2003: Accountant Edition make sure the journal report has been expanded. The way to confirm this is that you will not see –MULTIPLE- in the memo field and the box at the top will say collapse, not expand.
Note: If everything is not one report, it is possible to repeat this process then copy and paste the individual transactions into one Excel file to use the tool, or to use the tool to create multiple import files.

Step 4 – Transfer for Excel
Make sure Excel is open first then click on the Excel button for the report in QuickBooks. This will automatically transfer the report into Excel for use with the tool. It is not required that you save the file at this point, although you may choose to save it if you wish.
Note: There are advanced options that can be set to control how the data appears in Excel. Confirm the choice is set to send header to page set up. You can also modify the settings to turn off space between columns, auto-filtering, etc.


- Select the export options. The second option of copying the new list entries will transfer the list information into the client’s file along with the transactions. This is important if new list entries have been created. Keep in mind that if the list entry already exists, the information from the import will overwrite it.

- Click on Next
- Choose where the file will be saved. The default name of “To_Be_Imported.iif” is used if another name is not specified. Pay special attention to the file name and where it is saved. Make sure the extension remains .iif to permit importing the data into QuickBooks.
<span times=”” new=”” mso-bidi-language:ar-sa=”” mso-ansi-language:en-us;mso-fareast-language:en-us;=”” “=””><br clear=”all”> </span></em></strong> </em></strong></p><h2><strong><em><a data-cke-saved-name=”_Toc50821318″ name=”_Toc50821318″>Step 6 – Create a New File</a></em></strong></h2><strong><em> <p> </p> <p>For either of the options below, beginning balances will be needed from the old file to be used in setting up the new file will be needed. This includes inventory quantity and value, Balance Sheet account balances, and any other information not transferred using the tool.</p> <p> </p> <p>Using QuickBooks 2002 or higher AND no payroll</p> <p> </p> <p>The easiest way to create a new file, if using a newer version of QuickBooks, is to choose File > Archive & Condense > “Delete ALL transactions.” This will preserve the lists and any service subscriptions and simply remove all the transactions. </p> <p> </p> <p> <img src=”/sites/default/files/6_17.gif” data-cke-saved-src=”/sites/default/files/6_17.gif” style=”width: 575px; height: 432px;” alt=””><br></p> <p> </p> <p>Using QuickBooks 2001 or prior AND/OR Payroll</p> <p> </p> <p>If an older version of QuickBooks is used, or if the payroll features have been used in the file, the previous alternative will not work. The software will not permit removing any transactions for the current year if the payroll option has been chosen. To create a new file choose File > New Company. Proceed through the interview until the option appears to “Skip the interview.” Click on that button; finish the remaining screens being sure to choose “none” for the chart of accounts to be used. </p> <p> </p> <p>The QuickBooks transaction copier cannot import payroll transactions. This means the set up of a new file that uses the payroll features has additional steps.</p> <p> </p> <p>If payroll has been used, for version 2003 complete the following steps in the old file:</p> <ol start=”1″ type=”1″> <li>Choose Employees > Employer Services > Add/Edit Services > Edit > Note the service key number. You will need it in the new file. </li> <li>Create Report > List > Employee Contact List > Modify the report to include any additional columns of information that will be needed to set up the employee again. Print the report for reference in setting up the new file.</li> <li>Create Report > List > Payroll Item List > Modify the report to include any additional columns of information that will be needed to set up the payroll items again. Print the report for reference in setting up the new file.</li> <li>Create Report > Employees & Payroll > Payroll Transaction Detail > Change the date range as appropriate. Print the report for reference in setting up the new file.</li> <li>Create Report > Employees & Payroll > Payroll Summary > Change the date range. Print the report for each month and quarter to serve as an easy reference that the information has been re-entered into the new file correctly. It can be used for year to date adjustments if the detail is not needed in the new file, or as a double check that the individual checks have been re-entered correctly.</li> </ol> <p>In the new file, the employee and payroll item list will need to be created, the payroll tax table subscription information entered, and the year-to-date information entered and reconciled.</p> <p> </p> <h2><a data-cke-saved-name=”_Toc50821319″ name=”_Toc50821319″>Step 7 – Import the Data</a></h2> <p>To import the data from the iif file created by the tool, choose File > Utilities > Import. The transactional entries and lists will be imported into the new file. The transactions will not be linked (i.e. the invoice and the receive payment will be there but they will not be marked as the receive payment applied to a specific invoice). Linking the transactions can be a step that is completed now, or it can be done over time. To remove old or unused list entries, condense the file with a date prior to the new file start date being sure to check the option to remove unused entries. Since there are no transactions associated with those entries, the will be automatically removed as part of the process.<br></p> <h2>More information on this topic</h2> <p><a data-cke-saved-href=”http://4luvofbiz.com/kb/premium.php?cat=25&id=1534″ href=”http://4luvofbiz.com/kb/premium.php?cat=25&id=1534″>QuickBooks Transaction Copiers</a></p> </em></strong><p></p><br>