
22 Nov List Importer
List Importer
What it Will Do
The List Importer makes it easy to import your text or Excel spreadsheets into QuickBooks. This includes lists, as well as beginning balances for customers, vendors, accounts and inventory items.
System Requirements:
The tool works with Excel 97 and higher and will create files that are compatible with QuickBooks 99 and higher.
How to Obtain the Tool
The tool is available for $49 from the store at www.4luvofbiz.com.
Download the tool from http://www.bigredconsulting.com/downloadpages/dllistimport.htm and double click to unzip it. Then launch Excel to choose Tools > Add-Ins > Browse to add the tool to the pull down menus at the top of Excel.
A trial version is available to test a limited number of list items and transactions. Once the tool is purchased and the registration key is entered into the tool, an unlimited number of list items and transactions can be used to create the import files.
How to Use the Tool
Install the Tool
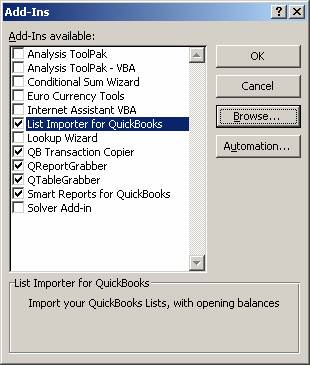
Once the software has been downloaded and unzipped, it needs to be integrated with Excel. Launch Excel to choose Tools > Add-Ins > Browse to add the tool to the pull down menus at the top of Excel.

Once you click on OK a new pull down menu will appear to easily access the tool.

Enter the key code to register the software by clicking on the pull down and then the “About & Purchase” option

Review the Examples and Instructions
The first choice on the new pull down menu is to see examples worksheets and instructions. By clicking on the tab across the bottom that displays the type of file to be created, the header information is provided. This header information then needs to match the spreadsheet that will be used by the tool to create the iif file. Also on each example spreadsheet are tips and tricks on how to use the tool most effectively. Below is an example for the customer list.

Although the “!Customer” heading with the related “Customer” in each column is said to be optional. It did not work for me without that column and data.
TRICK: Also, keep in mind that if the tool will be used to transfer the balance only, for example, all the other fields in QuickBooks will be replaced with blank information, even if the column headings are not included on the spreadsheet. If the lists have already been created in the QuickBooks file first, be sure to export them so they can imported again subsequent to importing the balances to replace the address, custom fields, etc.
Creating the Spreadsheet
Once the format is understood, and the spreadsheet with the data to be used to create the import has been adjusted as needed (most specifically with the appropriate exact headings) the tool can then be used to create the iif file. Simply click on the “List Importer for QuickBooks” pull down and choose “Export active workbook to IIF”
A pop up box will appear requesting which type of list is being exported, where the iif file should be saved, and if beginning balances are being created the date that should be used. Once the information is completed as needed, click on create file.

TRICK: Cash basis beginning balances have always been a challenge because of the use of Opening Balance Equity. By using this tool, once the iif file has been created, it can be modified as needed. For example, for the beginning balances for customers, rather than using the default account of “Opening Bal Equity” use an income account. This can be easily accomplished by opening the iif file in Excel and using the find and replace feature to edit the spreadsheet in Excel. When the file is imported, the transactions will now be associated with the new account.

Once the iif import file is ready for import, open the QuickBooks data file and create a back up file in case anything goes wrong. Choose File > Import > IIF file (depending on the version, the choice may vary slightly). Choose the file and click on open. If there are any errors, a pop up warning should appear.

TRICK: Due to error checking limitations with the iif file format, be sure to spot check the information (or in the case of balance transfer check to make sure the total match as expected).
Summary
This tool takes the guess work out of creating an iif file that will work. For less than $50 it is an inexpensive investment for a huge time saver.