23 Nov Legrand CRM: Item Tracking Module and QuickBooks
Legrand CRM: Item Tracking Module and QuickBooks
Legrand can import the product list and the item detail. However, there are a few tricks to make the process as easy as possible.
Set Up Prior to Importing
Prior to importing the item detail, confirm that all items have been set up or imported and all customers match either the company name and city or the contact first name, last name and phone number. This information is available directly from list reports in QuickBooks that can be saved as a CSV file and imported into Legrand CRM.
Item:Sub-Item Split Trick
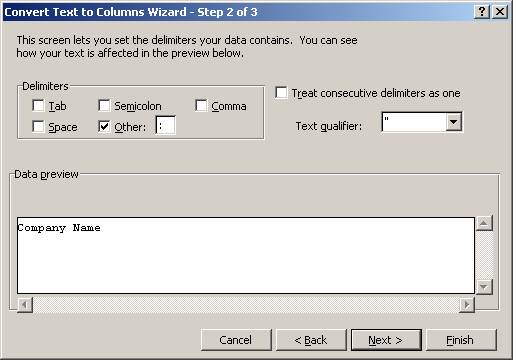
It might be helpful to have the QuickBooks item list set up as items and sub-items which can then be split in Legrand as Categories and products depending on the search options desired long term. In Excel, to split the two columns (since they come in as one column from Excel) insert a column to the right of the item name, then choose Data > Text to Columns > it should default to delimited > Next > Uncheck tab and check other and in the box put a colon “:”

Click on Finish and the single column will be split into two.
Items with Company
The advantage to this alternative is that it is possible directly from QuickBooks without any additional software requirements.
Step 1 – Create a Sales by Item Detail (sales by customer detail will work as well). Click on Modify Report and confirm that the item, date, amount, name, name city, and memo (optional) columns have been checked to appear on the report. Then click on Export to create an Excel spreadsheet of the report.
Step 2 – Split the item and sub-item into two columns if needed. A unique “serial number” will be required by Legrand CRM on the import so if there are various item line with the same transaction number it may be necessary to create an additional column for mapping purposes (edit > fill may help to create sequential unique numbers). Save the file as a CSV format.
Step 3 – File > Import > Company Item Tracking will launce the mapping wizard (or you can choose a saved Profile) and import the spreadsheet. Any errors will appear on a report at the end.
Items with Contacts
The advantage of this method is that each item is associated with a contact which facilitates future marketing efforts and reports based on which specific contact have or have not purchased specific products.
A QuickBooks Add-On product called the QDataViewerwill be required to successfully accomplish creating this type of import file because on the sales reports QuickBooks does not provide access to the first and last name fields.
Exception: if all customers in QuickBooks have a contact name that is simply the first and last name, that column can be added to the report in QuickBooks then split into two columns using the divider of a space rather than a column like was explained for items and sub-items. The steps would then be the same as with companies as detailed above.
Step 1 – Obtain and install QDataViewer and the Legrand report template if not done already. Confirm QuickBooks is running with the appropriate data file open. Open QDataViewer.
Step 2 – Choose the report, set the date parameters, and on the printing and exporting tab, choose the format as “ExcelRecord,” choose a file name (click on the … to change the folder the report will be stored in if needed). At this point click on preview or export.

Step 3 – Open Excel, split the item and sub-item into two columns if needed, and save as a CSV file.
Step 4 – File > Import > Contact Item Tracking will launce the mapping wizard (or you can choose a saved Profile) and import the spreadsheet. Any errors will appear on a report at the end.

